Over the last year, I have written many blog posts about Model Context Protocol (MCP). I think this is a great protocol to build multi-modal AI applications. One of those posts was about What's Missing in MCP, where I mentioned a couple of features I would like to see in the MCP standard.
However, that list seems was not complete. Now after some time of experimenting with MCP servers in production environments, I have found another important missing feature: Reverse MCP Servers.
What do I mean by Reverse MCP Servers?
Model Context Protocol (MCP) is an open protocol that standardizes how applications provide context to Large Language Models (LLMs). It allows AI agents to connect to various tools and data sources through MCP servers. If you're new to MCP, think of it as a universal adapter that lets AI agents access different services and tools in a standardized way.
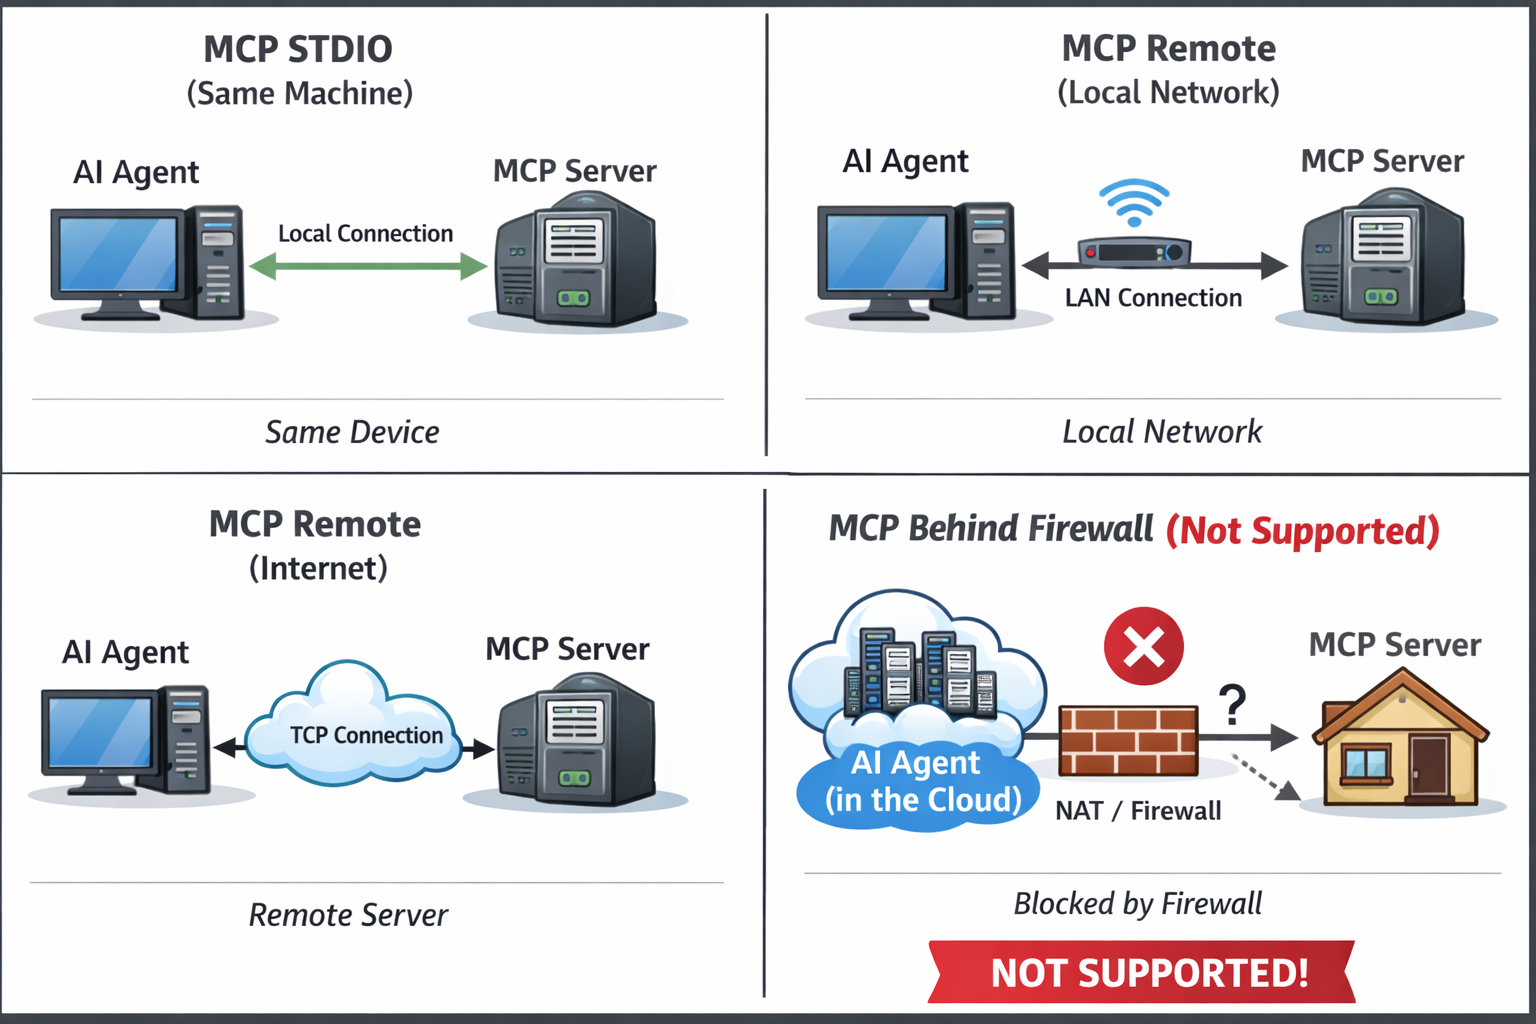
Currently, there are two types of "transport" for MCP servers:
- STDIO - when an MCP server is running on the same machine as the AI agent using it.
- Remote (Streaming HTTP) - when an MCP server is running on a different machine and is accessed over the network.
In the case of remote MCP servers, the AI agent connects to the MCP server by opening a connection to a known host and port. This is the standard way remote MCP servers work. It means that the MCP server must be running on some public IP address or domain name somewhere on the internet (as an option, it can be in the same local network as the AI agent, but still the AI agent connects to it remotely over TCP).
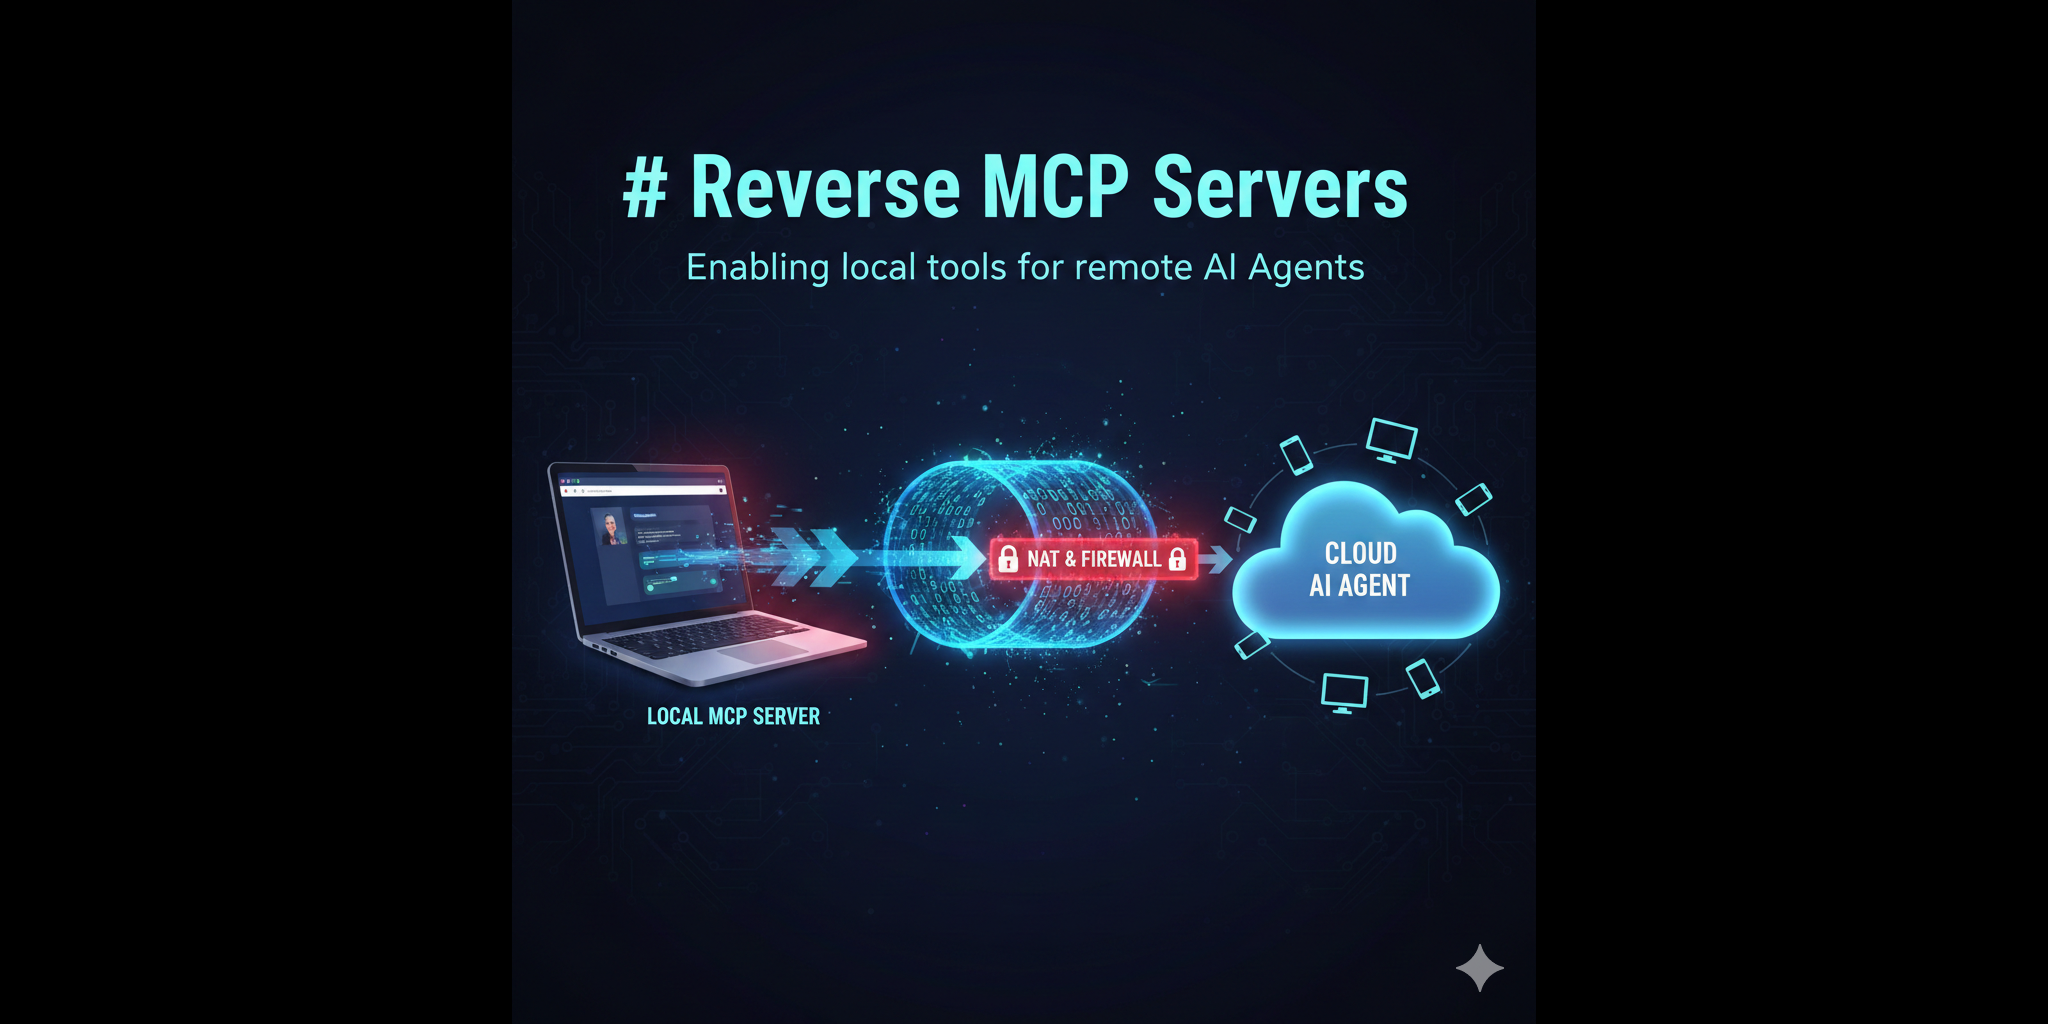
However, I can see many use cases when the opposite is needed: the MCP server is running on a local machine (for example, on a developer's laptop) and the AI agent is running somewhere on the internet (for example, in a cloud). In this case, the AI agent cannot connect to the MCP server directly because it is not publicly accessible.
Real-World Use Cases
Example 1: Personal AI Assistant. I have my own AI chat application running in the cloud. My family is using it from different devices - smartphones, tablets, laptops. The agent must run in the cloud to be accessible from anywhere. I want to extend the agent's capabilities by adding some custom tools implemented as MCP servers. I want to connect my home desktop to this agent (as a set of tools), and I also want to connect my smart home devices to this agent (as another set of tools). But all these devices are behind NAT and firewalls, so the agent in the cloud cannot connect to them directly.
Example 2: Development Tools. A developer wants their cloud-based AI assistant to access tools running on their local machine - such as local database queries, file system operations, or development environment commands - without exposing these tools to the public internet.
Example 3: IoT and Edge Devices. IoT devices in a home or industrial setting that need to provide data and tools to a cloud-based AI agent but cannot accept incoming connections due to network restrictions.
In all these cases, the only way to connect the MCP server running on a local machine to the agent running in the cloud is to have the MCP server initiate the connection to the agent. In other words, the MCP server must act as a client and connect to the agent's MCP endpoint. This is what I call Reverse MCP Server.
New transport type: reverse-websocket
This is one more feature request to the MCP standard: a new transport type called reverse-websocket (or reverse-remote-http as a more generic name). This transport type means that the MCP server will connect to the specified remote MCP endpoint as a client, instead of waiting for incoming connections.
I use WebSockets as the transport layer because we need a persistent, bi-directional connection between the MCP server and the AI agent. WebSockets are well suited for this purpose.
I am going to describe this transport type in more detail and I will try to post it in MCP discussion groups. I hope if there is enough interest from the community, this feature will be added to the MCP standard.
While waiting: I implemented Reverse MCP Servers support today
To verify how this could work in practice, I have implemented a simple prototype of Reverse MCP Connector using my small AI Agent tool CleverChatty. I have extended this tool to support the reverse-websocket transport type. I will also show a simple example of an MCP server able to connect to a remote AI Agent endpoint over this connector.
Terminology note
There is some confusion in terminology here. We have the term "MCP server" which is the entity that provides tools and services over the MCP protocol. But from the terms of the transport layer, our server is acting as a "client" because it initiates the connection to the remote agent endpoint. And the AI Agent is acting as a server because it listens for incoming connections from MCP servers.
To solve potential confusion, I will use the following terms in this post:
- "Reverse MCP Connector" - the component of the AI Agent that implements the
reverse-websockettransport type and acts as a WebSocket server accepting incoming connections from MCP servers. - "Reverse MCP Server" - the MCP server that uses the
reverse-websockettransport type to connect to the AI Agent's Reverse MCP Connector. It acts as a WebSocket client.
AI Agent's Reverse MCP Connector
I have extended CleverChatty to support the reverse-websocket transport type.
The config is extended to specify the connector port and other settings:
    "reverse_mcp_settings":{
        "enabled": true,
        "listen_host": "0.0.0.0:9090",
        "tls": {
            "enabled": true,
            "cert_file": "path/to/cert.pem",
            "key_file": "path/to/key.pem"
        }
    }
This WebSocket server can use TLS encryption if needed.
Reverse MCP Server example
I have taken the MCP server example from my previous post about Implementing Authentication in a Remote MCP Server. This MCP server implements a simple tool that allows running CLI commands on the hosting machine. It was originally an MCP server with SSE transport and authentication.
Now I have modified this server to use the reverse-websocket transport type and connect to the AI Agent's Reverse MCP Connector. So, instead of running as an HTTP server waiting for incoming connections, this MCP server will connect to the specified remote endpoint. In this code, I have tried to separate the transport layer from the MCP server logic as much as possible. So, the tool and MCP server logic are the same as in the previous example; only the transport layer is changed.
This is the main.go file:
package main

import (
	"context"
	"flag"
	"fmt"
	"os"
	"os/exec"

	"github.com/mark3labs/mcp-go/mcp"
	"github.com/mark3labs/mcp-go/server"
)

func main() {
	// Command line flags
	host := flag.String("host", "localhost:9090", "Host:port of the reverse MCP connector")
	serverName := flag.String("name", "reverse-mcp-server", "Server name to identify this MCP server")
	authToken := flag.String("token", "", "Authentication token")
	useTLS := flag.Bool("tls", false, "Use TLS (wss://)")
	insecure := flag.Bool("insecure", false, "Skip TLS certificate verification (for self-signed certs)")
	flag.Parse()

	// Create the MCP server with tools registered
	// Note: We use StdioServer as the base because it handles the MCP protocol,
	// but we'll adapt it to work over WebSocket instead of actual stdio
	stdio := createStdioServer()

	// Configuration for the reverse client
	config := ClientConfig{
		Host:       *host,
		ServerName: *serverName,
		AuthToken:  *authToken,
		UseTLS:     *useTLS,
		Insecure:   *insecure,
	}

	// Start the reverse client
	if err := StartReverseClient(context.Background(), stdio, config); err != nil {
		fmt.Printf("Error: %v\n", err)
		os.Exit(1)
	}
}

func createStdioServer() *server.StdioServer {
	// Create MCP server
	s := server.NewMCPServer(
		"Server to manage a Linux instance",
		"1.0.0",
	)

	// Define the exec_cmd tool
	execTool := mcp.NewTool("exec_cmd",
		mcp.WithDescription("Execute a Linux command with optional working directory"),
		mcp.WithString("command",
			mcp.Required(),
			mcp.Description("The full shell command to execute"),
		),
		mcp.WithString("working_dir",
			mcp.Description("Optional working directory where the command should run"),
		),
	)

	// Add the tool (no auth wrapper needed - auth is done at WebSocket connection level)
	s.AddTool(execTool, execCmdHandler)

	return server.NewStdioServer(s)
}

func execCmdHandler(ctx context.Context, request mcp.CallToolRequest) (*mcp.CallToolResult, error) {
	args, ok := request.Params.Arguments.(map[string]interface{})
	if !ok {
		return mcp.NewToolResultError("invalid arguments"), nil
	}

	cmdStr, ok := args["command"].(string)
	if !ok || cmdStr == "" {
		return mcp.NewToolResultError("command is required"), nil
	}

	// Optional working_dir
	var workingDir string
	if wd, ok := args["working_dir"].(string); ok {
		workingDir = wd
	}

	// Use "sh -c" to allow full shell command with arguments and operators
	cmd := exec.Command("sh", "-c", cmdStr)

	if workingDir != "" {
		cmd.Dir = workingDir
	}

	output, err := cmd.CombinedOutput()

	if err != nil {
		// Include both the error and output for context
		return mcp.NewToolResultError(fmt.Sprintf("execution failed: %v\n%s", err, output)), nil
	}

	return mcp.NewToolResultText(string(output)), nil
}
And this is the client.go file that implements the reverse client logic:
package main

import (
	"context"
	"crypto/tls"
	"fmt"
	"net/http"
	"net/url"
	"os"
	"os/signal"
	"sync"
	"syscall"

	"github.com/gorilla/websocket"
	"github.com/mark3labs/mcp-go/server"
)

type ClientConfig struct {
	Host       string
	ServerName string
	AuthToken  string
	UseTLS     bool
	Insecure   bool
}

func StartReverseClient(ctx context.Context, stdioServer *server.StdioServer, config ClientConfig) error {
	// Build WebSocket URL
	scheme := "ws"
	if config.UseTLS {
		scheme = "wss"
	}
	u := url.URL{Scheme: scheme, Host: config.Host, Path: "/ws"}

	// Add query parameters
	q := u.Query()
	q.Set("server_name", config.ServerName)
	if config.AuthToken != "" {
		q.Set("token", config.AuthToken)
	}
	u.RawQuery = q.Encode()

	fmt.Printf("🔌 Connecting to %s as '%s'...\n", u.String(), config.ServerName)

	// Set up headers
	header := http.Header{}
	header.Set("X-MCP-Server-Name", config.ServerName)
	if config.AuthToken != "" {
		header.Set("Authorization", "Bearer "+config.AuthToken)
	}

	// Configure WebSocket dialer
	dialer := websocket.Dialer{}
	if config.UseTLS && config.Insecure {
		dialer.TLSClientConfig = &tls.Config{
			InsecureSkipVerify: true,
		}
	}

	// Connect to WebSocket
	conn, resp, err := dialer.Dial(u.String(), header)
	if err != nil {
		if resp != nil {
			return fmt.Errorf("failed to connect: %v (HTTP %d)", err, resp.StatusCode)
		}
		return fmt.Errorf("failed to connect: %v", err)
	}
	defer conn.Close()

	fmt.Println("✅ Connected successfully!")

	// Create WebSocket adapter for stdio transport
	// This adapter allows the stdio server to communicate over WebSocket
	// by implementing io.Reader and io.Writer interfaces
	wsAdapter := NewWebSocketAdapter(conn)

	// Handle graceful shutdown
	shutdownCtx, cancel := context.WithCancel(ctx)
	defer cancel()

	sigChan := make(chan os.Signal, 1)
	signal.Notify(sigChan, syscall.SIGINT, syscall.SIGTERM)

	go func() {
		select {
		case <-sigChan:
			fmt.Println("\n👋 Shutting down...")
			cancel()
			conn.Close() // Close connection to stop Listen
		case <-shutdownCtx.Done():
			// Parent context cancelled
			conn.Close()
		}
	}()

	fmt.Println("🚀 Serving MCP over WebSocket...")

	// Serve MCP over the WebSocket connection
	if err := stdioServer.Listen(shutdownCtx, wsAdapter, wsAdapter); err != nil {
		if shutdownCtx.Err() != nil {
			// Context cancelled - graceful shutdown
			fmt.Println("👋 Server stopped")
			return nil
		}
		return fmt.Errorf("server error: %v", err)
	}
	return nil
}

// WebSocketAdapter adapts a websocket.Conn to io.Reader and io.Writer interfaces
// needed by the stdio server. This allows us to reuse the stdio server implementation
// while communicating over WebSocket instead of actual stdio streams.
type WebSocketAdapter struct {
	conn     *websocket.Conn
	readBuf  []byte
	readMux  sync.Mutex
	writeMux sync.Mutex
}

// NewWebSocketAdapter creates a new WebSocket adapter
func NewWebSocketAdapter(conn *websocket.Conn) *WebSocketAdapter {
	return &WebSocketAdapter{
		conn: conn,
	}
}

// Read implements io.Reader interface
func (w *WebSocketAdapter) Read(p []byte) (n int, err error) {
	w.readMux.Lock()
	defer w.readMux.Unlock()

	// If we have leftover data from previous read, use it first
	if len(w.readBuf) > 0 {
		n = copy(p, w.readBuf)
		w.readBuf = w.readBuf[n:]
		return n, nil
	}

	// Read new message from WebSocket
	_, message, err := w.conn.ReadMessage()
	if err != nil {
		return 0, err
	}

	// Ensure message ends with newline (JSON-RPC messages should be newline-delimited)
	if len(message) > 0 && message[len(message)-1] != '\n' {
		message = append(message, '\n')
	}

	n = copy(p, message)
	if n < len(message) {
		// Store the remainder for next read
		w.readBuf = message[n:]
	}
	return n, nil
}

// Write implements io.Writer interface
func (w *WebSocketAdapter) Write(p []byte) (n int, err error) {
	w.writeMux.Lock()
	defer w.writeMux.Unlock()

	err = w.conn.WriteMessage(websocket.TextMessage, p)
	if err != nil {
		return 0, err
	}
	return len(p), nil
}

// Close implements io.Closer interface
func (w *WebSocketAdapter) Close() error {
	return w.conn.Close()
}
This transport layer can be simply reused for any MCP server created with the same Go MCP library.
Security of Reverse MCP Servers
Security is critical when allowing external servers to connect to your AI agent. In my implementation, I have added simple token-based authentication. The Reverse MCP Connector in the AI Agent accepts a token parameter during the WebSocket connection handshake. The Reverse MCP Server must provide this token to authenticate itself. Every Reverse MCP Server must be registered in the config and can have its own token.
Unknown or unauthenticated servers will be rejected during the connection attempt.
Full security is achieved by using TLS encryption for the WebSocket connection. The Reverse MCP Connector can be configured to use TLS with proper certificates. The Reverse MCP Server must connect using the wss:// scheme and validate the server certificate (or skip validation for self-signed certs if needed for development).
This is a simple but effective way to secure the connection between the MCP server and the AI agent.
Testing of the Reverse MCP Server and Connector
How does this all work in practice?
This is the simplest config for the AI Agent (CleverChatty instance):
{
    "agent_id":"my_assistant",
    "log_file_path": "",
    "model": "openai:gpt-4o-mini",
    "system_instruction":"You are the helpful assistant.",
    "tools_servers": {
        "reverse_mcp_server_name": {
		    "transport": "reverse_mcp",
		    "auth_token": "secret-token"
        }
    },
    "a2a_settings":{
        "enabled":true,
        "agent_id_required":true,
        "url":"http://localhost:8080/",
        "listen_host":"0.0.0.0:8080",
        "title":"My Great Assistant"
    },
    "openai": {
        "apikey": "sk-.....A"
    },
    "reverse_mcp_settings":{
        "enabled": true,
        "listen_host": ":9090"
    }
}
Presume this config is saved in the folder /path/to/test/config/folder with the name cleverchatty_config.json.
Presume our agent is running on the public host myassistant.example.com and is accessible over the internet.
Config explanation
- The
tools_serverssection defines a Reverse MCP Server with namereverse_mcp_server_nameand the authentication tokensecret-token. If our agent would use other MCP servers, they would be defined here as well. - The
reverse_mcp_settingssection enables the Reverse MCP Connector listening on port 9090 without TLS (for testing purposes only). - The
a2a_settingssection enables the web interface to interact with the AI agent. This will allow us to chat with the agent and use the connected MCP server tools. - We use OpenAI GPT-4o-mini model for the agent (it is possible to use Ollama, Anthropic, Google models as well if configured properly).
Running the setup
Before to run the setup, make sure you have the latest version of CleverChatty installed - cleverchatty-server version should show at least version 0.3.0 or higher.
1. Run the AI Agent (CleverChatty) with the above config:
cleverchatty-server run --directory "/path/to/test/config/folder"
This will start the agent listening on port 8080 and the Reverse MCP Connector on port 9090.
2. Run the chat client to connect to the agent:
cleverchatty-cli --server http://myassistant.example.com:8080 --agentid test1
Now we can chat with the agent from this client using the nice CLI interface. If we type the command /tools we will see an empty list of tools because no MCP server is connected yet. We can only chat with the model without any tools.
3. Run the Reverse MCP Server on your local machine (where you want to provide tools from):
Presume we have compiled the Reverse MCP Server code above into the binary file reverse_mcp_server.
./reverse_mcp_server --host myassistant.example.com:9090 --name reverse_mcp_server_name --token secret-token
This will start the Reverse MCP Server and it will connect to the AI Agent's Reverse MCP Connector at myassistant.example.com:9090 using the provided server name and token.
4. Now, if we go back to the chat client and type /tools command again, we will see the list of tools provided by the connected Reverse MCP Server:
Assistant:       Available Tools:
      • reverse_mcp_server_name
        • exec_cmd: Execute a Linux command with optional working directory
5. We can ask the AI Agent to execute some commands using the exec_cmd tool. For example:
Hey Assistant, check what is in root. run ls -l /
And we will get the result back!
6. Stop the Reverse MCP Server by pressing Ctrl+C in its terminal. The connection will be closed and the tools will no longer be available in the AI Agent.
Now if you type /tools command in the chat client again, you will see an empty list of tools again.
Dynamic list of tools
With this change, I have introduced another important feature: the dynamic list of tools. Before, the list of tools was static - it was defined in the config file of the AI Agent and loaded when the agent started. Now, with Reverse MCP Servers, the list of tools can change dynamically at runtime. When a Reverse MCP Server connects, its tools are added to the agent's available tools. When it disconnects, its tools are removed.
This will require rethinking some workflows in AI Agents using MCP servers, but overall it is a powerful feature that allows extending the agent's capabilities on the fly.
Conclusion
Reverse MCP Servers open new possibilities for integrating local tools and services into remote AI agents. By allowing MCP servers to initiate connections to agents, we can overcome NAT and firewall limitations and enable dynamic toolsets.
This fills an important gap in the MCP standard and I hope it will be adopted by the community. Meanwhile, my implementation in CleverChatty can serve as a prototype and reference implementation for others to experiment with this concept.
I have used the example of an MCP server created with the Go MCP library, but a similar approach can be implemented in other languages and frameworks as well, such as FastMCP in Python or other MCP implementations.
Discussion
I am open to discussion and feedback on this idea. If you have use cases, suggestions, or improvements, please reach out:
- GitHub: https://github.com/Gelembjuk/cleverchatty/issues
- Twitter/X: Share your thoughts and tag me
- LinkedIn: Connect and message me
- Email: Available on my blog at gelembjuk.com